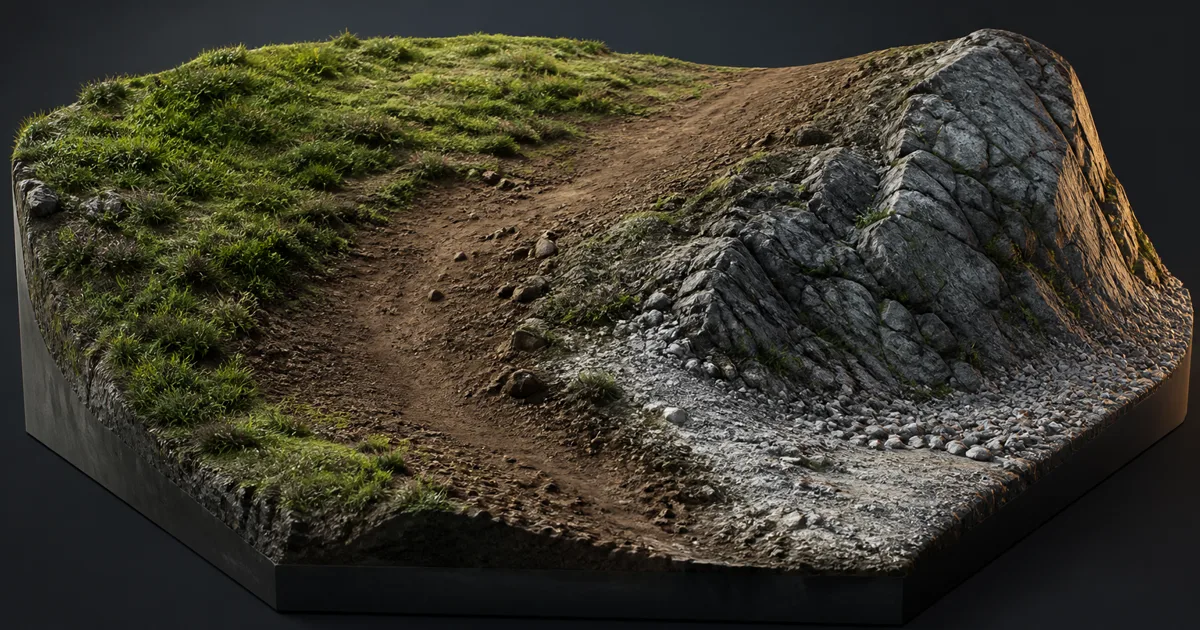
A texture splatting shader can contain excellent grass, dirt, rock, and gravel and still produce a landscape that looks like damp carpet. The individual materials are rarely the problem. The transition is. A wide linear crossfade mixes colors, normals, roughness, and height until neither surface retains its structure.
Texture splatting gives every terrain point a set of layer weights. Those weights decide how much each complete PBR material contributes, letting a dirt path cut through grass, rock emerge on steep slopes, and gravel collect in drainage channels. The method scales from a hand-painted prop to a streamed world, but only when the control data, material scale, blend math, and shader budget agree.
Texture splatting blends materials, not just colors
At its simplest, texture splatting evaluates several materials at the same surface point and combines them with weights. For four layers, a shader might store the weights in one RGBA texture: red for grass, green for soil, blue for rock, and alpha for gravel. The channel assignment is arbitrary; the contract is not.
Each layer should carry the properties needed by the destination shader:
- Base color or albedo.
- Tangent-space normal detail.
- Roughness or smoothness.
- Height when the transition uses relief.
- AO, metalness, and optional masks when physically relevant.
- A documented physical tile size.
If the terrain texture splatting shader blends base color but switches normals with a hard threshold, the boundary will change shape as the light moves. If it blends roughness but leaves one layer’s height active everywhere, dirt can inherit rock relief. Treat the layer as a coordinated material record and use the same normalized weights for every compatible property.
This differs from a texture atlas. An atlas selects a region of one packed image; texture splatting samples multiple layer materials and mixes their results. It also differs from decals, which usually add local detail above an existing surface. The texture arrays guide covers one efficient way to store synchronized layer sets, while the decal textures guide handles independent markings.
A splat map is a budget of weights
A splat map is control data, not visible color. In a weight-normalized setup, the active channels should add to one. Painting more rock reduces the contribution of grass, dirt, and gravel instead of adding a fifth layer of brightness.
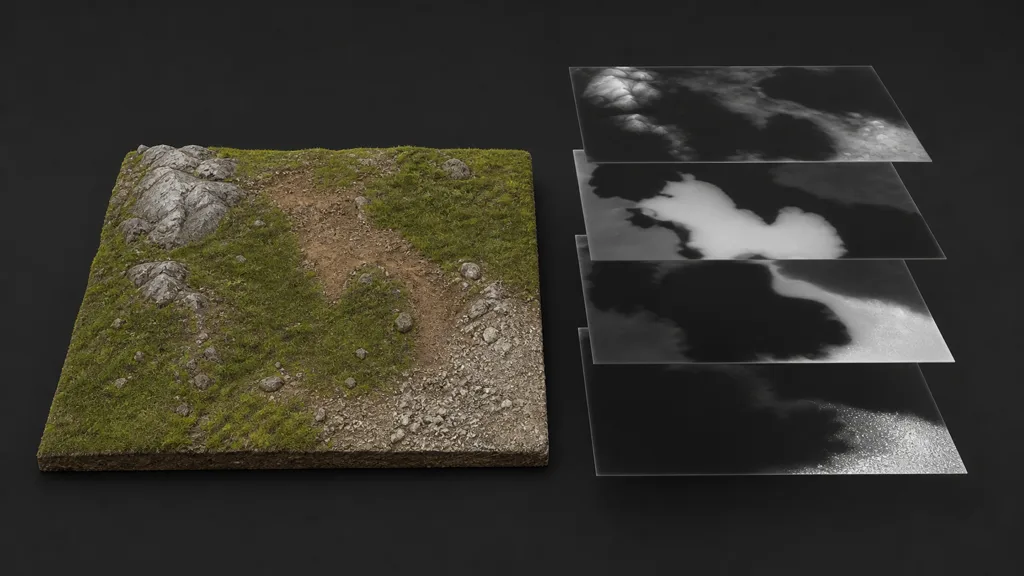
Use this small contract for every control map texture:
| Decision | Good default | Failure when ignored |
|---|---|---|
| Channel meaning | Fixed RGBA layer order | Materials swap after export |
| Color space | Linear, sRGB disabled | Midpoint weights shift |
| Normalization | Weights sum to one | Dark or overbright transitions |
| Empty pixels | One guaranteed base layer | Black terrain or invalid normals |
| Resolution | Based on paint detail | Soft paths or wasted memory |
| Tile borders | Shared texels or padded paint | Cracks between terrain chunks |
The terrain blend map does not need the same resolution as the tiled surface textures. Spend control resolution on the smallest boundary a player must read, then let tiled PBR maps supply the microdetail.
Import the map as linear data and inspect every channel independently. Compression can make one weight steal influence from another near soft borders. When precision is tight, renormalize decoded weights in the shader and preserve a reliable fallback layer.
Build complete layers before building transitions
Fix each material in isolation first. Match physical scale, remove directional lighting from base color, set normal strength, and establish roughness under the same neutral rig. A grass texture with five-centimetre blades cannot blend convincingly into dirt whose pebbles imply half a metre.
Give all layers compatible mapping. World-space projection is common for large landscapes; ordinary UVs work for meshes with deliberate unwraps; triplanar mapping can protect steep faces. The triplanar mapping guide explains the projection cost and normal handling. Whichever mapping you choose, record metres per tile.
Keep macro variation separate from the base texture splatting weights. A useful hierarchy is:
- Biome or region chooses the eligible material family.
- Slope and height generate a sensible first pass.
- Painted weights direct paths, banks, and landmarks.
- Height-aware blending shapes the local boundary.
- Macro noise breaks repeated fields without moving the intended edge.
How to make a splat map that stays editable
- Choose the layer set. Limit one terrain region to materials that genuinely need to meet there.
- Assign a stable channel contract. Record which material occupies each RGBA channel and which layer is the fallback.
- Block broad regions. Paint the large material zones before small paths.
- Add procedural guidance. Use slope, elevation, curvature, drainage, or simulation outputs as editable masks.
- Normalize the weights. Ensure the active set sums to one and no texel loses every layer.
- Refine meaningful edges. Direct roads, erosion lines, cliff bases, and gameplay routes in world units.
- Add height data carefully. Let raised features win locally while the painted mask controls the broad transition.
- Repair terrain-tile borders. Paint across shared edges, copy border texels, and test lower mips.
- Validate the shipped shader. Inspect layers, passes, compression, filtering, and target hardware.
For how to make a splat map from external tools, export raw linear weights when possible. Preserve the source masks so the packed runtime asset remains a delivery format, not the only editable copy.
Height-aware texture splatting keeps surface structure
Linear blending is useful for soft substances with similar relief. Rock meeting soil benefits from another cue: raised stones should remain visible while dirt fills the gaps. Height-aware texture splatting adjusts the painted weights with each layer’s height near the transition.
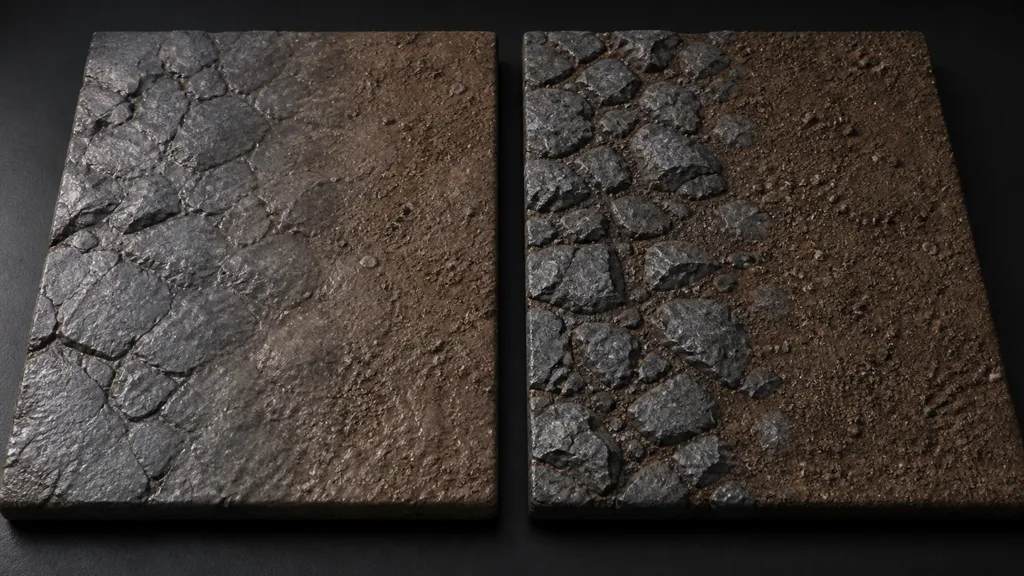
Keep height influence bounded. If it is too strong, tiny differences overpower the painted boundary, create noisy islands, and crawl when mip levels change. Outside the overlap, a fully painted layer must remain fully painted.
Height maps need a shared interpretation. Remap each layer into a comparable local range before blending. The displacement map guide explains why grayscale is not automatically a physical distance.
Blend normals with a method appropriate to tangent-space detail, then normalize the result. Roughness also needs a perceptual check because a fifty-fifty numeric blend does not always read as a fifty-fifty surface.
Control texture splatting performance and repetition together
Texture splatting performance is driven by layers evaluated per pixel, maps per layer, projection method, virtual-texture path, and terrain passes. Eight assigned layers are not free merely because only three look obvious from the camera.
Profile by region. Restrict the candidate layer set for each tile, skip networks whose weight is zero when the engine supports it, and share packed scalar maps. A texture channel packing contract can reduce files, while texture compression must still respect normals and linear masks.
At distance, lower mips can blur narrow paths and average high-contrast normals into a different response. Test texture filtering while the camera moves. Preserve gameplay-critical roads through a dedicated mask or geometry when a few control texels cannot represent them.
Texture splatting in Unity, Unreal Engine, and Blender
For texture splatting Unity terrain, create Terrain Layer assets for complete material inputs, then paint weights with Paint Texture. Unity’s Terrain Layers manual notes that URP and the Built-in pipeline use four layers per texture pass, while HDRP supports up to eight per tile in one pass. Count assigned layers as well as visible ones, and test the exact render pipeline.
For an Unreal landscape layer blend, use named layers and a LandscapeLayerBlend node. Epic’s Landscape Material Expressions documentation distinguishes weight, alpha, and height blends and warns that all-height-blended layers can produce zero-contribution black spots. Keep a dependable base contribution and use layer switches where an unused region can skip work.
For Blender terrain texture blending, vertex colors or image masks can drive Mix nodes between complete shader branches. Blender’s Vertex Paint manual stores paint as Color Attributes that material nodes can read. Vertex density limits edge precision, so use an image-based terrain blend map when paths must be sharper than the mesh.
The names and storage differ, but the portable contract is small: layer order, mapping scale, control weights, optional height ranges, scalar color space, normal orientation, and fallback behavior.
Validate texture splatting as a terrain system
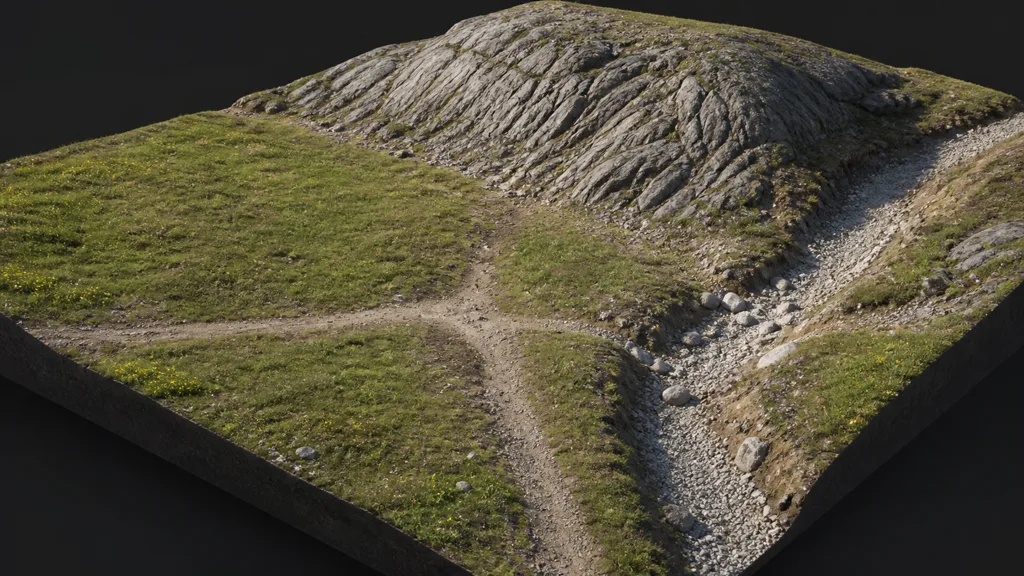
Build a test tile with flat ground, a convex hill, a concave channel, a steep cliff, a path junction, and a border shared with another tile. Paint every layer alone, every pair at fifty percent, and one crowded region with all supported layers.
Check texture splatting under neutral overhead and low grazing light. Walk from macro distance to ground level, then force low mips, lower quality tiers, platform compression, and the maximum terrain-layer count.
| Symptom | Likely cause | First useful check |
|---|---|---|
| Transition becomes gray mud | Broad blend or mismatched scale | View each complete layer alone |
| Black pixels appear | Zero weights or invalid normal | Display normalized weights |
| Rock islands sparkle | Height influence is too sharp | Force lower mips |
| Path breaks at tile border | Border weights disagree | Compare edge texels by channel |
| Layer changes after export | Channel order changed | Render an RGBA debug view |
| Frame time jumps | Too many active layers | Profile by terrain tile |
| Steep faces stretch | Planar mapping overextended | Test triplanar projection |
| Painted edge is too soft | Control resolution is low | Measure texels per metre |
The best texture splatting workflow 2026 keeps debug outputs in the shipping material: raw weights, normalized weights, selected layer count, height-adjusted weights, and final normals. Terrain bugs become less mystical when the shader shows its paperwork.
FAQ
What is texture splatting?
Texture splatting uses control weights to combine several tiled textures or complete PBR layers across one surface. It is widely used for terrain, cliffs, roadsides, and large meshes that need local variation without unique high-resolution textures everywhere.
How does texture splatting work?
A shader samples multiple materials and multiplies each result by a stored or generated weight. The normalized contributions are combined across compatible properties so the boundary remains coherent under changing light.
What is a splat map?
A splat map is a control texture whose channels store material weights, commonly four layers in RGBA. It should use linear sampling, a fixed channel contract, and a valid base layer wherever other weights are absent.
How many textures can a splat map blend?
One RGBA map commonly stores four weights, but a shader can use more maps, arrays, or passes. The practical limit comes from renderer behavior, shader complexity, samplers, memory, and target hardware.
Should splat maps use sRGB?
No. Splat maps store numeric weights and should normally be sampled as linear data. sRGB decoding changes midpoint values and therefore changes the blend.
What is height blending in terrain materials?
Height blending modifies overlapping weights with local height information so raised stones, clumps, or cracks influence the boundary. It should refine the painted transition, not replace the broad mask.
Why are there seams in my texture splatting terrain?
Texture splatting seams usually come from mismatched border texels, inconsistent mapping origins, different active layer sets, or mip and padding problems. Compare raw weights and coordinates on both sides before changing the materials.
Try CraftPBR
CraftPBR creates the coordinated layers used by a texture splatting shader:
- Text-to-PBR generates a complete set from a description of terrain substance, scale, color, moisture, and wear.
- Photo-to-PBR converts a controlled ground reference into aligned base color, normal, roughness, height, AO, and metalness maps.
- Node workspace keeps tiling, levels, height range, masks, and variants editable while you test transitions.
- Engine export prepares normal orientation, linear scalar maps, channel packing, filenames, and target conventions.
- Free tier lets you build and test complete grass, soil, rock, or gravel layers before expanding the terrain set.
- CC0 output lets you modify, blend, render, and ship generated textures without attribution.
Let the control map decide where a material lives. Do not ask the crossfade to invent geology on its lunch break.