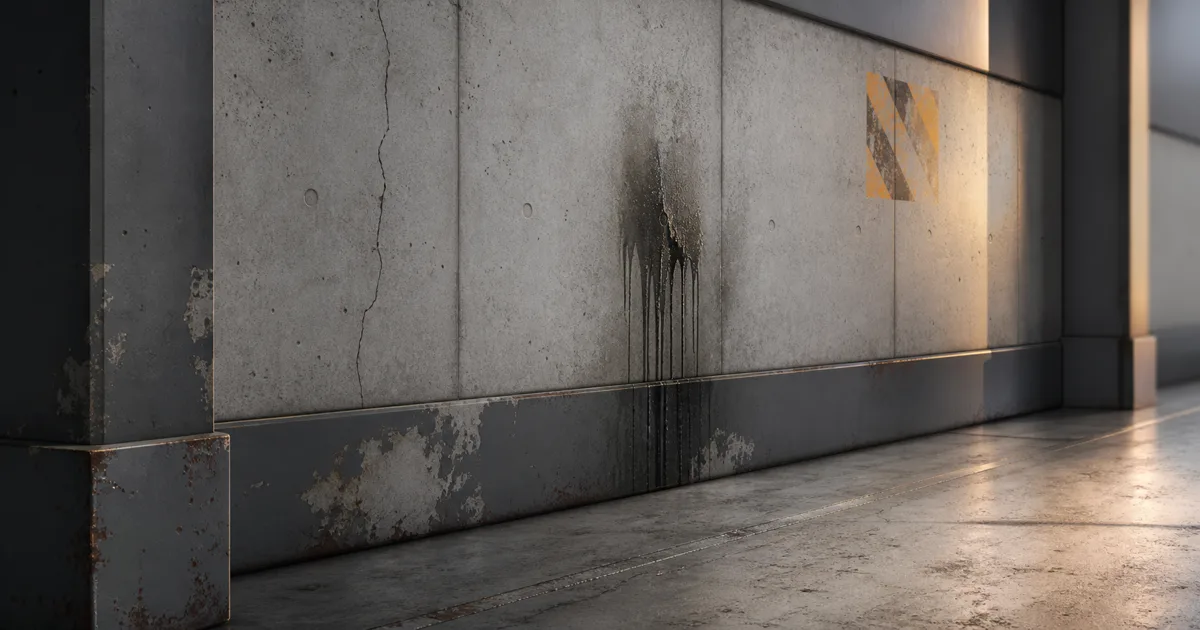
The cleanest wall in a game is usually suspicious. Real surfaces collect repairs, leaks, scratches, paint, dust, warnings, and evidence that somebody once moved a heavy cabinet badly. Decal textures add those local events without forcing every wall panel to own a unique material.
That separation is the useful part. The base tile describes what the surface is; a decal describes what happened here. A small library of decal textures for games can turn repeated modules into distinct places while keeping the underlying seamless texture, trim sheet, and UV layout reusable.
Decal textures separate reusable surfaces from local events
A decal is a bounded material layer placed over another surface. It may contribute base color, normal, roughness, metalness, emissive, or opacity depending on the engine and render path. The receiving wall still supplies its concrete pores and broad material response; the decal contributes the chipped paint, wet streak, patched crack, soot halo, footprint, or painted mark.
Texture decals are useful for three jobs:
- Story: leaks begin below pipes, impacts cluster around conflict, repairs follow access panels, and dirt gathers where traffic actually passes.
- Variation: repeated wall and floor modules stop announcing their grid because distinctive features are placed independently.
- Material correction: a local roughness shift, normal break, or color patch can repair an area without rebaking the whole asset.
Decals are not automatically cheaper than unique texturing. Every visible layer still needs sampling and blending, and large overlapping projectors can spend pixels with enthusiasm. They are efficient when the same small material library creates many deliberate differences.
Keep the base material quiet enough to repeat. If a memorable oil spill is already baked into the tile, adding three more spills as decals produces a facility apparently operated by one very persistent leak.
Build decal textures as a coherent PBR map set
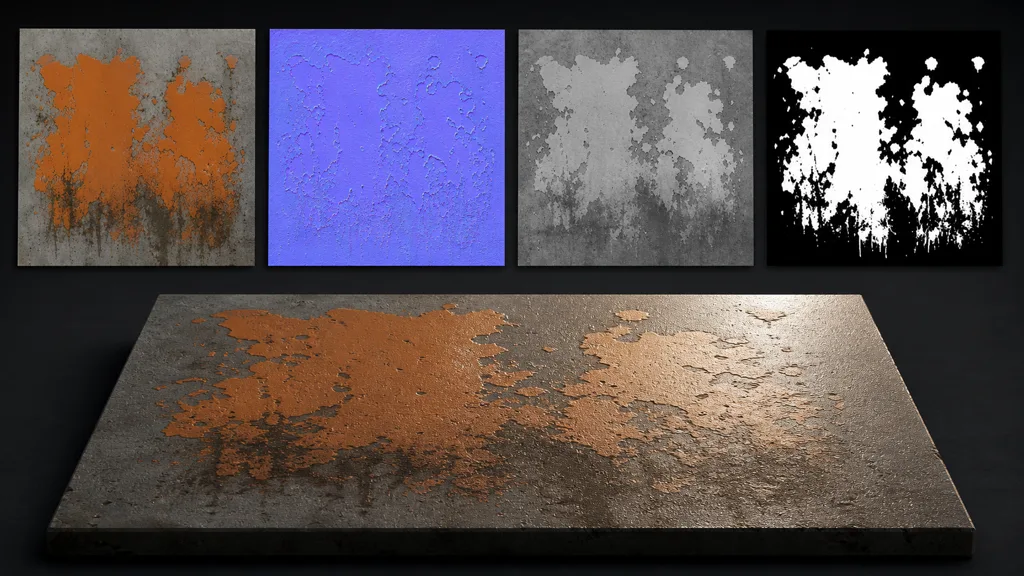
Good PBR decals change only the properties the event should affect. Dry dust may lighten base color and raise roughness without adding a dramatic normal. Chipped paint can alter color, roughness, and normal around lifted edges. A wet mark may mostly darken color and lower roughness. A crack needs believable relief but should not turn the entire receiver into a different substance.
Build each set from a shared silhouette:
- Base color: the visible pigment or stain, kept free of baked lighting.
- Opacity: coverage and feathering. Preserve enough edge softness to blend, but avoid a huge field of nearly invisible pixels.
- Decal normal map: shallow local relief such as flaked coating, scratched grooves, or cracked edges. Keep tangent convention consistent with the target engine.
- Decal roughness map: the change in microsurface response. Wet, polished, dusty, oxidized, and freshly painted regions should react differently under a moving light.
- Optional masks: metalness, emissive, height, or material-specific controls only when the receiver and decal path support them.
All maps need the same crop, dimensions, and silhouette. A normal edge extending beyond opacity creates a faint lighting halo. A roughness patch shifted by two pixels makes the surface catch a highlight beside the visible paint. The maps can be individually plausible and collectively wrong, which is a surprisingly common team achievement.
Treat color as sRGB and physical data as linear. Keep clean masters before engine packing. The PBR workflow guide covers channel meaning and color-space rules; decals merely apply those rules inside a bounded layer.
Choose projector, mesh, or baked placement
The right placement method depends on surface shape, motion, count, and platform.
Projected decals use a box or frustum to map the material onto geometry inside a volume. They are fast to place on walls, floors, pipes, and assembled modular scenes, and they can wrap across small changes in depth. Projection is also indiscriminate unless receivers or layers are controlled: a wall stain can land on a character, prop, or adjacent floor because each object happened to enter the box.
Mesh decals use thin custom geometry fitted close to the receiver. They give precise UVs, silhouettes, and control on curved or moving assets. They are useful for panel graphics, vehicle wear, character details, and places where a projector stretches across an edge. The costs are extra geometry, possible z-fighting, LOD coordination, and another asset that must follow deformation correctly.
Baked detail belongs in the unique texture when it is permanent, asset-specific, and always visible. A manufactured label on one hero prop or wear that must follow a skeletal mesh may be simpler to bake. Do not build a placement system merely to avoid editing one file.
Use projectors for flexible scene dressing, mesh decals for exact fitted detail, and baked information for details that are genuinely part of the asset. A production environment commonly uses all three.
How to make decal textures step by step
- Name the physical event. Decide whether the decal is paint, oil, dust, rust, damage, repair, or printed material. That determines which PBR channels should change.
- Set real coverage. Record the intended width and height in world units before authoring fine detail. A 20-centimeter scuff should not grow into a two-meter geological formation.
- Create the opacity silhouette. Use varied edges and internal breakup, but crop empty borders. Test it against light and dark receivers.
- Author aligned PBR changes. Derive color, normal, roughness, and optional masks from the same features. Keep relief shallow unless the geometry truly changes.
- Add dilation and safe borders. Extend valid edge colors beyond visible coverage so filtering and mipmaps do not pull in unrelated atlas pixels.
- Choose placement. Test a projected box, fitted mesh, or baked layer on the hardest production surface, not only a front-facing plane.
- Validate in motion. Move past the decal at near, middle, and far distance under grazing light. Watch edges, normals, sorting, fade, and receiver selection.
- Measure a stressed scene. Duplicate representative decals, overlap several, fill a meaningful part of the screen, and profile the target build.
The best decal texture workflow 2026 is evidence-driven. Approve a small family first: one stain, one crack, one coating chip, one dust edge, and one painted detail. If those survive the render path, atlas, lighting, and camera, expand the library from a known recipe.
Fix decal stretching with projection discipline
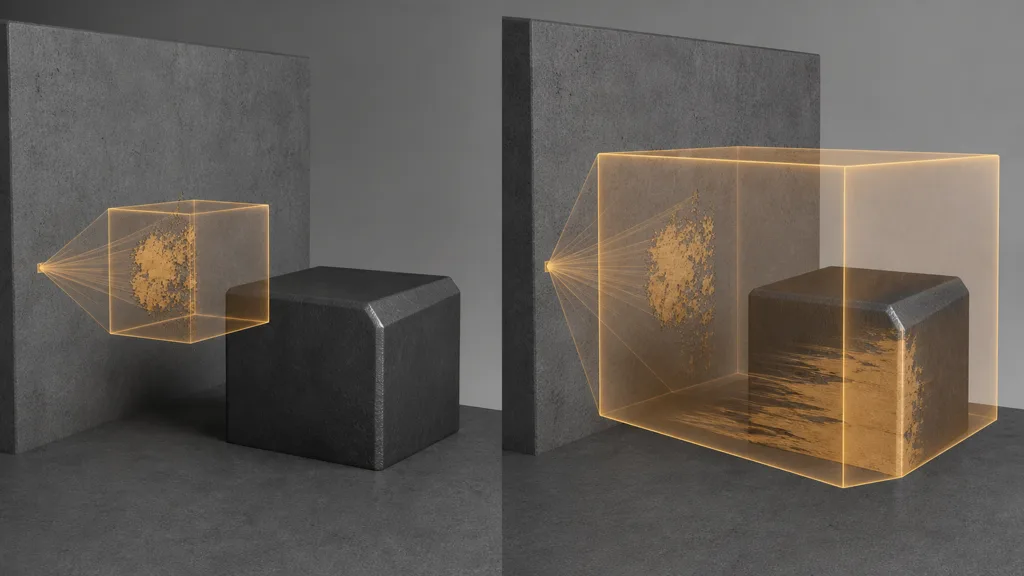
To fix decal stretching, first inspect the projection volume rather than the source image. A projector maps along one direction. Surfaces facing that direction receive a sensible footprint; surfaces close to parallel can receive compressed or smeared coordinates. Deep boxes also touch objects that were never part of the artistic plan.
- Aim the projector close to the receiver normal instead of firing across a grazing surface.
- Keep depth only large enough to reach the intended geometry.
- Crop the volume before it crosses corners, floors, props, or back faces.
- Use angle fades when supported so nearly perpendicular surfaces reject the projection gradually.
- Exclude characters, particles, transparent props, and neighboring geometry through receiver flags or rendering layers.
- Switch to a fitted mesh when the mark must follow strong curvature or cross a specific seam.
Projection stretching is not the same as UV stretching. The base mesh can have excellent UVs while the decal projector still smears along a side face. Conversely, a mesh decal uses its own UVs and can fail through ordinary unwrap distortion. Identify which coordinate system is on trial before rearranging it.
Pack a decal atlas without edge artifacts
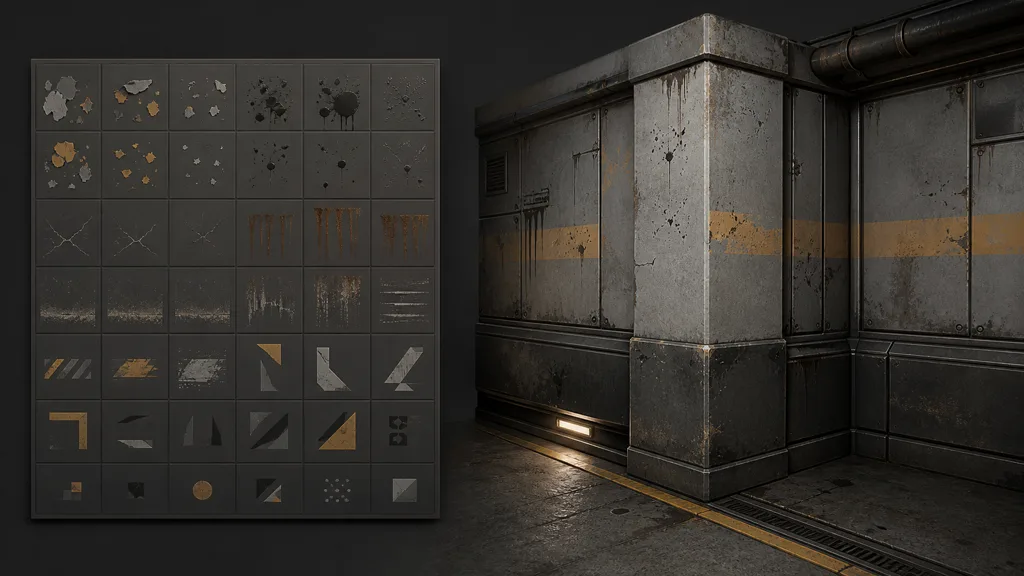
A decal atlas combines many small motifs into one texture set. Shared materials reduce asset switching and let a placement component select a region through UV scale and offset. Atlases work especially well for families of grime, paint chips, scratches, cracks, and small abstract markings that share resolution, compression, and channel needs.
- Give each cell enough padding for bilinear filtering, mipmaps, and compression blocks.
- Dilate color and data values beneath transparent borders; transparent RGB is still sampled during filtering.
- Keep map cells perfectly aligned across color, normal, roughness, and opacity atlases.
- Group compatible content. A crisp painted mark and a broad soft stain may deserve different resolutions or formats.
- Inspect low mip levels. A narrow gutter eventually collapses, and the neighboring rust streak may volunteer for your clean paint chip.
The texture atlas guide explains general packing and mip bleeding. For decal textures, alpha coverage makes the edge test more demanding because a faint fringe is visible against many possible receivers.
Diagnose decal edge artifacts, sorting, and fading
| Symptom | Likely cause | Next test |
|---|---|---|
| Pale or dark fringe | Transparent border contains bad RGB, wrong alpha mode, or insufficient dilation | Inspect RGB with alpha disabled; expand valid edge colors |
| Square around the mark | Opacity never reaches zero or compression pollutes the mask | View the opacity channel and imported mip chain |
| Normal halo | Decal normal extends beyond visual coverage or blends incorrectly | Disable normal contribution, then align its mask |
| Smear on side faces | Projection angle is too shallow or volume too deep | Tighten and reorient the box; compare a mesh decal |
| Flicker with another decal | Sorting ambiguity, coplanar mesh, or unstable depth | Separate surfaces slightly and define few sort groups |
| Vanishes in a build | Missing render feature, stripped shader variant, receiver disabled, or unsupported path | Test one minimal decal in the packaged target |
| Looks pasted on | Color changes but roughness, normal, scale, and wear logic disagree | Inspect under moving grazing light |
To isolate decal edge artifacts, replace the decal temporarily with a solid high-contrast patch using the same opacity. Then restore roughness, normal, and color one channel at a time. This reveals whether the failure lives in coverage, sampling, data alignment, or material blending.
Use fade distance as an art control, not camouflage. A decal that disappears before its pixels become unstable can save work, but a large story-critical mark should transition cleanly through mipmaps and screen-size fading. Test temporal anti-aliasing and upscaling too; thin cracks and soft alpha edges may behave differently in motion than in a still editor view.
Set up decal textures in Unity and Unreal Engine
For decal textures Unity projects using URP, add the Decal Renderer Feature to the active renderer, create a Decal Shader Graph material, and assign it to a Decal Projector. Unity’s URP decal documentation describes projector and screen-space techniques, normal blending, and receiver controls. Confirm the active renderer asset for every quality tier and camera; a perfect material assigned to a renderer without the feature remains admirably theoretical.
In HDRP, use a Decal Projector or mesh decal, then control draw distance, angle fade, decal layers, and material contributions. Transparent receivers and atlas settings carry pipeline-specific costs, so test the exact HDRP asset and target platform rather than assuming URP behavior transfers.
For decal textures Unreal Engine projects, use a material with the Deferred Decal domain and place it through a Decal Actor, component, or mesh. Epic’s decal materials documentation explains DBuffer and GBuffer application, receiver response, sort order, screen-size fading, and channel support. Restrict the Decal Response on receiving materials to the channels actually required and disable Receives Decals on unintended actors.
Across both engines, validate deferred versus forward paths, mobile support, transparency, baked lighting, shader stripping, and rendering layers. A feature existing in the editor does not guarantee that every platform path implements the same blend.
Budget screen coverage, overlap, and repetition
Decal cost depends heavily on screen coverage, material complexity, render path, and overlap. Ten compact bolt stains can be cheaper than one room-sized projector with mostly transparent pixels. A stack of wetness, dirt, damage, paint, and debug decals asks the renderer to revisit the same screen region several times.
Profile these cases:
- the closest approved camera, where one decal covers the most pixels;
- the busiest corridor or arena, where many volumes overlap;
- the lowest supported GPU and mobile render path;
- moving lights, shadows, transparency, and temporal effects used in the shipped scene;
- decals enabled and disabled in a matching packaged capture.
Reuse can also become visual repetition. Rotate or mirror only non-directional marks. Leaks follow gravity, tire tracks follow travel, scraped paint follows contact, and soot follows heat or airflow. Build variants with different silhouettes and roughness response rather than scaling one heroic stain across the entire project. The library should feel related, not cloned.
FAQ
What are decal textures in games?
Decal textures are bounded material layers placed over existing surfaces to add local color, normal, roughness, opacity, or other changes. They are commonly used for dirt, damage, paint, leaks, markings, footprints, and repairs without creating a unique base texture for every object.
How do decals work in games?
Projected decals map a material through a volume onto compatible geometry, while mesh decals use fitted geometry and their own UVs. The renderer blends supported decal channels with the receiving surface during an appropriate render pass.
What maps does a PBR decal need?
Most PBR decals need opacity plus only the material channels the event changes: often base color, normal, and roughness. Metalness, emissive, or height should be added only when physically justified and supported by the target decal path.
Why is my decal stretched on walls or corners?
The projector is probably hitting a surface at a shallow angle or extending too deeply across nearby geometry. Reorient and crop the volume, add angle fading or receiver filtering, or use a fitted mesh decal for strong curvature and exact placement.
How do I remove a border around a decal texture?
Inspect opacity and the RGB values beneath transparent pixels, then add edge dilation and sufficient atlas padding. Confirm alpha interpretation, compression, mip generation, and color space in the imported runtime texture rather than trusting the source preview.
Should decals use a texture atlas?
An atlas is useful when many decals share dimensions, compression, and PBR channels. Leave generous padding, align every map atlas, and inspect low mip levels; otherwise adjacent cells bleed into transparent edges.
Are decals expensive in games?
Their cost grows with screen coverage, shader complexity, overlapping layers, and the chosen render path. Keep projection volumes tight, contribute only needed channels, fade tiny distant marks, and profile representative scenes on target hardware.
Try CraftPBR
CraftPBR gives decal textures the same coherent source discipline as a full surface material:
- Text-to-PBR creates aligned material maps from a physical description of paint, grime, rust, dust, or damage.
- Photo-to-PBR converts a controlled surface photo into coordinated base color, normal, roughness, height, AO, and metalness.
- Node workspace keeps masks, edge breakup, levels, tiling, and material variations editable while you build a decal family.
- Engine export prepares clear map roles, normal orientation, color/data handling, and packed channels for common destinations.
- Free tier lets you generate and test a complete PBR set before committing to a library or atlas.
- CC0 output lets you modify, crop, pack, project, render, and ship generated materials without attribution.
Create a PBR material for your next decal library →
Let the base material describe the building. Let the decals remember what happened to it.