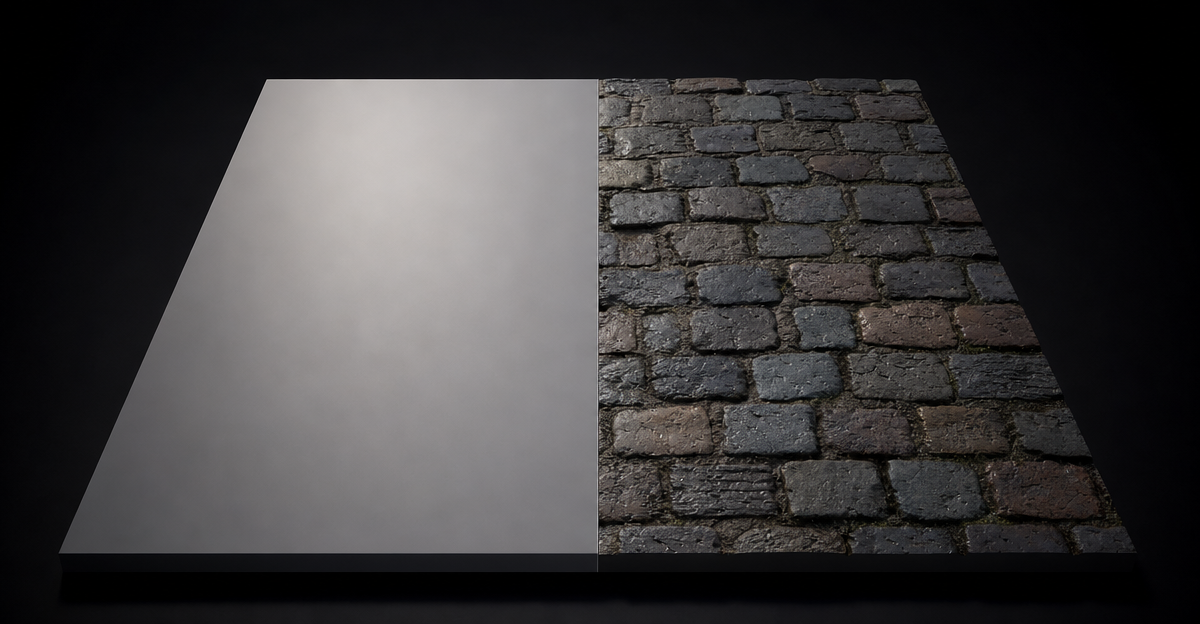
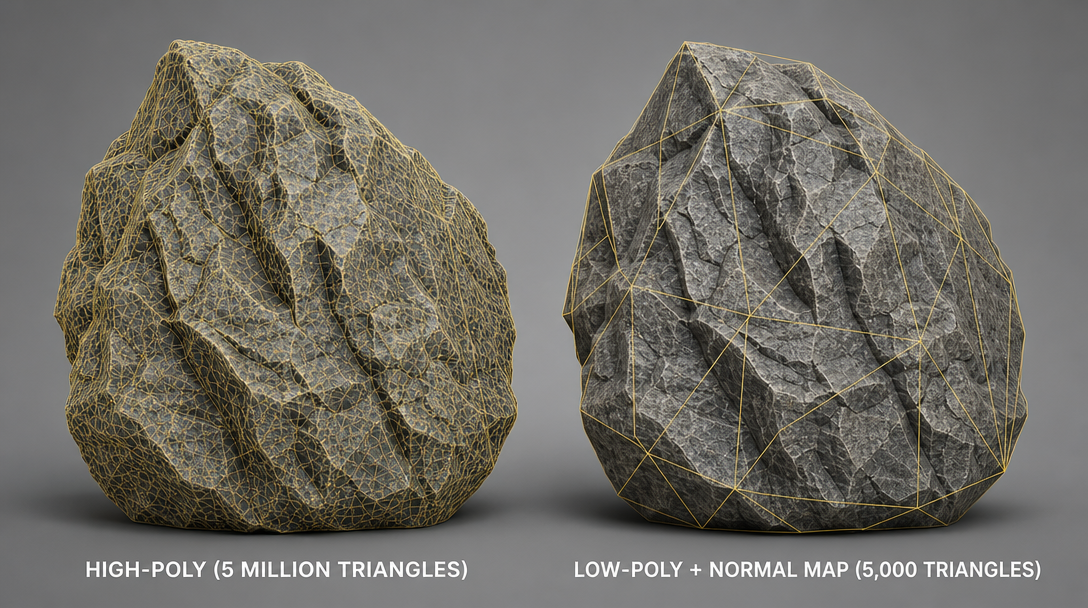
A normal map is an RGB image that stores a surface direction at every pixel, not a colour. The renderer uses those directions to fake fine surface detail — pores, scratches, grain, panel lines — without adding a single polygon. That is why a flat plane with a good normal map can look like cobblestone, and a 5,000-triangle character can look like 50,000.
Every modern game engine, archviz renderer, and web 3D viewer reads normal maps the same way. Get the format right and your asset looks identical in Unity, Unreal, Blender, Godot, and Three.js. Get the format wrong and it looks lit from the inside out. We’ll cover both.
Why normal maps are purple
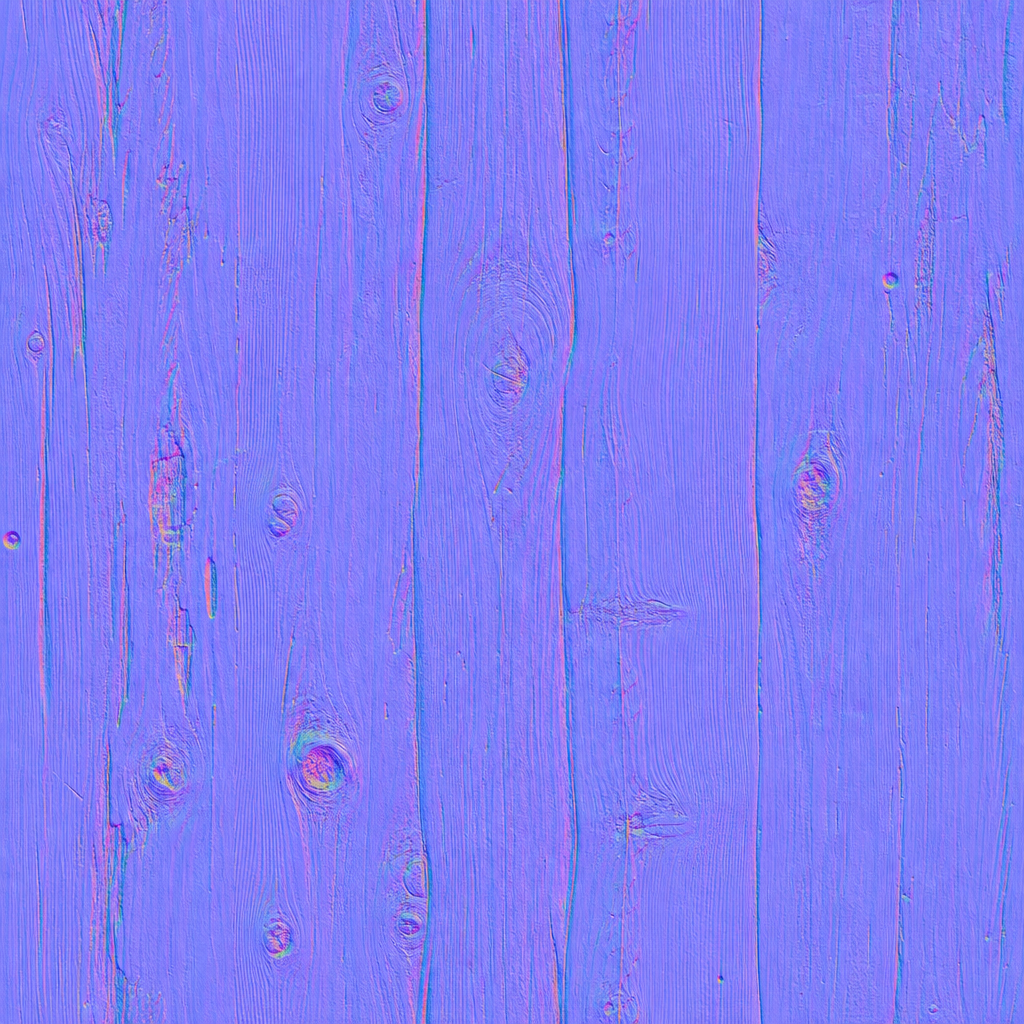
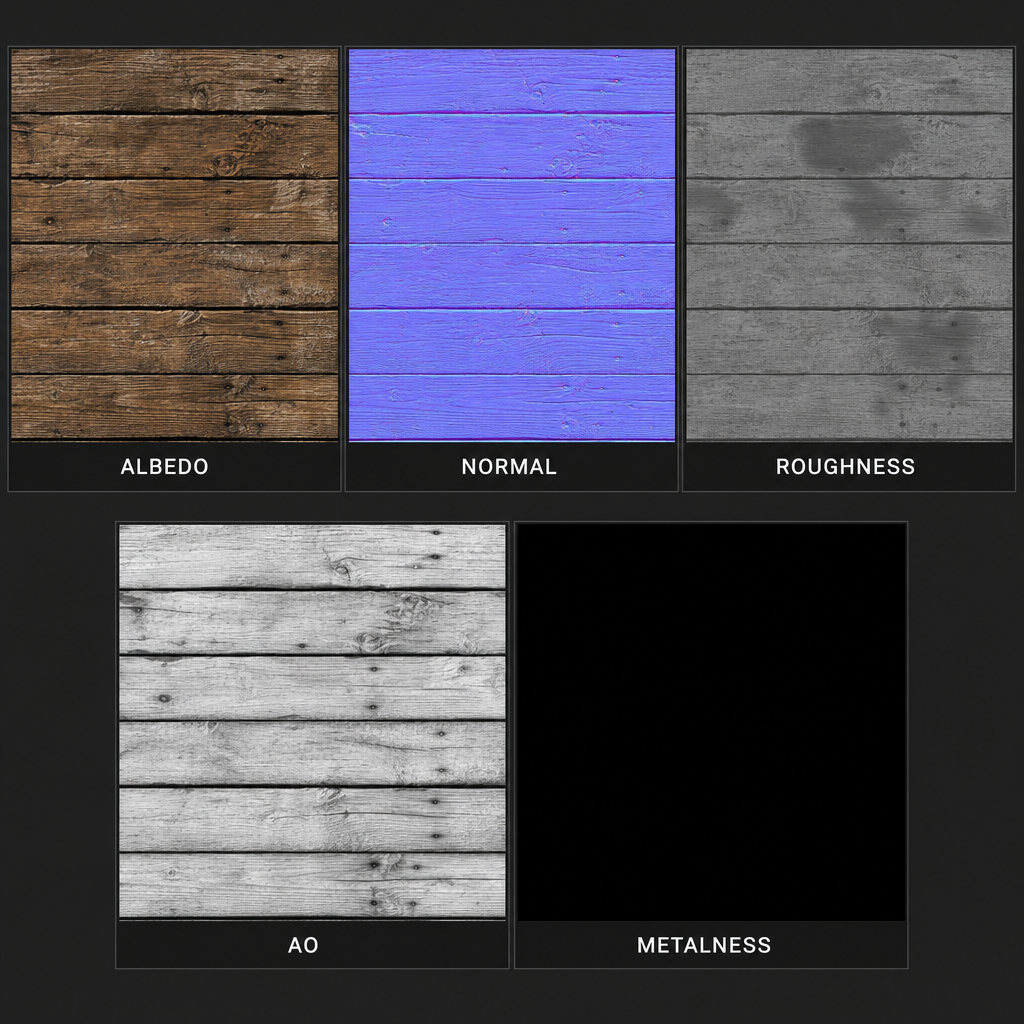
Open a normal map in Photoshop and it’s a wash of purple/blue. That’s not stylistic — it’s the encoding. Each pixel stores an (X, Y, Z) direction packed into the (R, G, B) channels, where zero direction maps to 128/255 (mid-grey) and full positive direction maps to 255. A pixel pointing “straight out” of the surface is (0, 0, 1) in 3D space, which encodes to (128, 128, 255) — light purple.
So a purple wash means “most of the surface is pointing outward,” which is what you want for an undamaged flat material. Splashes of green, red, and cyan are the bumps and crevices — and the more variety you see, the more detail the map carries.
Tangent-space vs object-space
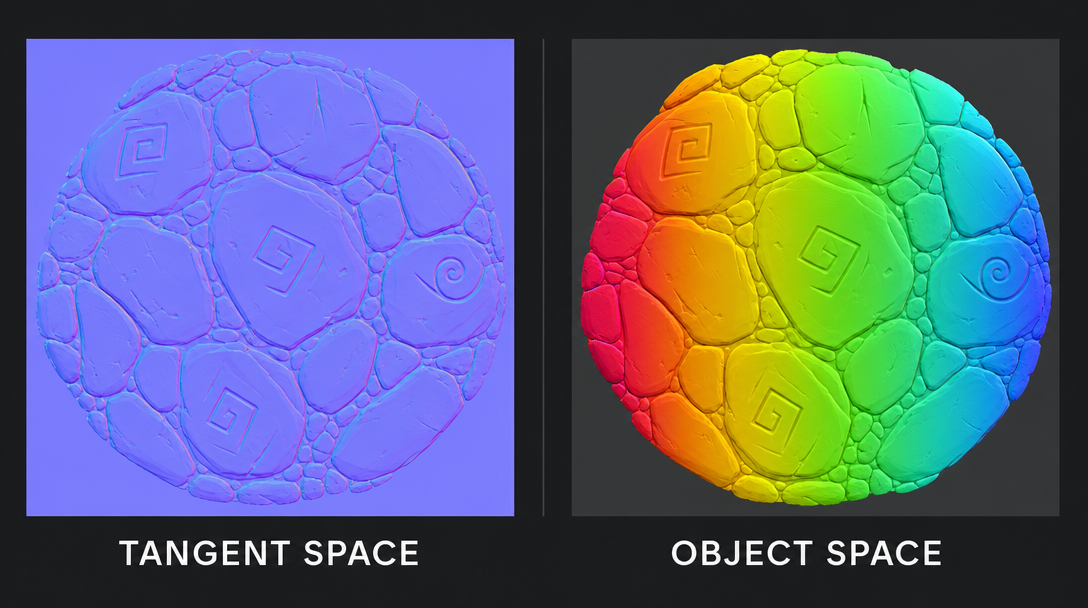
There are two kinds of normal maps and you almost always want the first one:
- Tangent-space normal maps store directions relative to the surface. They look purple. They work on deforming geometry — characters, cloth, animated meshes. This is the default in every PBR pipeline.
- Object-space normal maps store directions in world coordinates. They look rainbow-coloured. They’re cheaper to compute at render time but break the moment the mesh deforms or rotates relative to the bake. Used only in very specific bake pipelines.
Normal map vs bump map vs height map
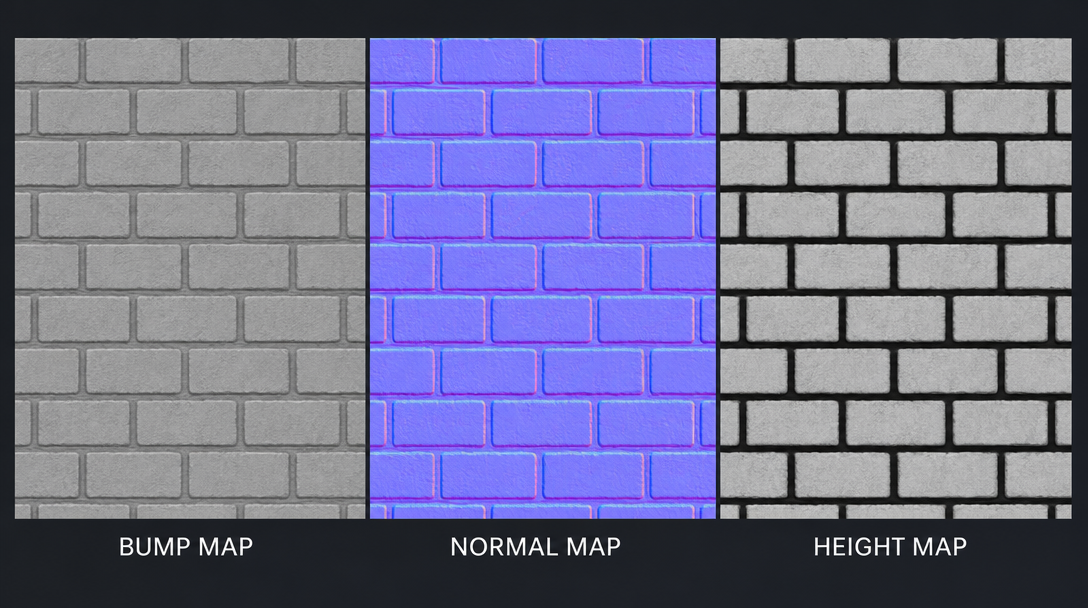
Three maps that all fake surface detail, ranked by how much information they carry:
- Bump map — single greyscale channel. White = raised, black = recessed. The renderer fakes lighting from luminance. Cheap, dated, looks flat at glancing angles.
- Normal map — three channels of direction data. The renderer has a full 3D vector per pixel and computes light response directly. Best balance of cost and quality.
- Height (displacement) map — single greyscale channel like a bump map, but actually moves geometry using tessellation. Most expensive; produces correct silhouettes and self-shadowing.
For 99% of game and archviz work, you ship a normal map. For hero close-ups or terrain you add a height map on top. (Read the normal map vs bump map comparison for the long version.)
The OpenGL vs DirectX gotcha
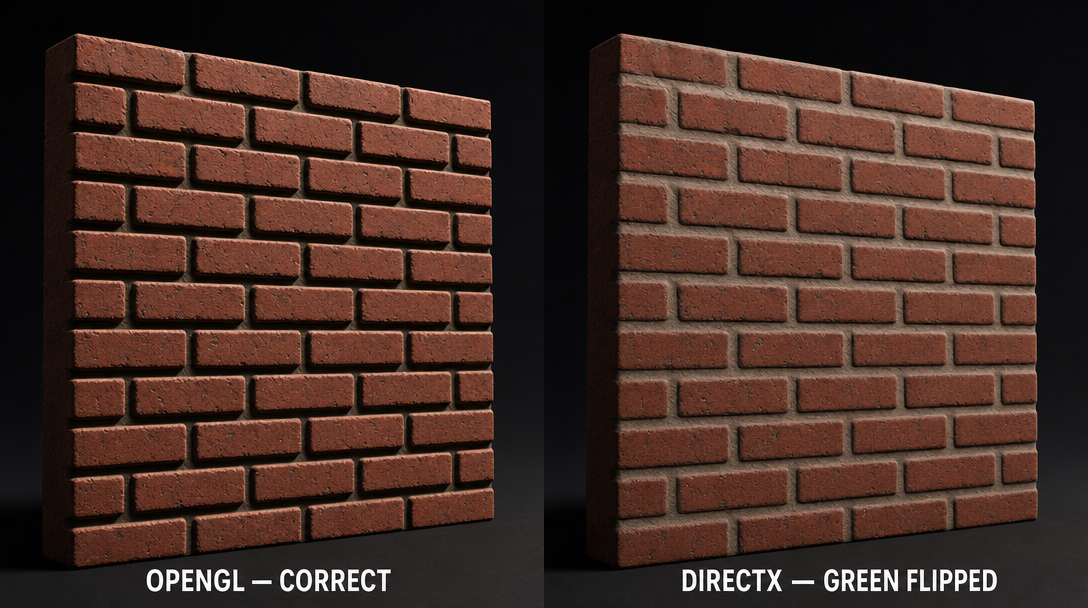
This is the bug that wastes more hours than anything else on this list. OpenGL and DirectX disagree on which direction the green channel points:
- OpenGL (Blender, Substance Painter, Godot) expects Y to point up.
- DirectX (Unreal Engine) expects Y to point down.
- Unity lets you pick on import — most templates default to DirectX.
Use the wrong convention and your surface lights inverted — bumps look like dents and dents look like bumps. The fix is one button: flip the green channel. CraftPBR’s exporter has a per-engine preset that handles this automatically.
Three ways to make a normal map
1. Bake from a high-poly mesh
Sculpt or model the surface in full detail, then project that detail onto a low-poly version’s UVs. Blender, Marmoset Toolbag, and Substance Painter all do this. Highest quality but slowest — sculpting a single asset can take a day.
2. Craft from a photo or height map
Convert greyscale luminance to a normal map using Sobel or Scharr edge detection. Tools: NormalMap Online, AwesomeBump, the Photoshop NVIDIA filter, Materialize. Works well for matte organic surfaces (concrete, fabric, dirt), less well for glossy or transparent ones (glass, polished metal).
3. Craft from a text prompt with AI
Describe the surface in plain English. AI crafts a base color and matching height map, then derives the normal map (along with roughness, AO, metalness) automatically. CraftPBR uses multi-scale Scharr filtering with edge-preserving smoothing, so the output is sharper than traditional luminance-based crafters — especially around mortar lines, cracks, and grain.
What resolution should a normal map be?
Match the texel density of your other maps. Going higher than the albedo wastes memory because the normal can’t resolve detail the colour doesn’t describe. Common targets:
- 1K (1024×1024) — mobile, switch, background props
- 2K (2048×2048) — modern PC/console baseline for most assets
- 4K (4096×4096) — hero assets at camera-near distances
- 8K+ — archviz close-ups only; almost always overkill in games
Common mistakes to avoid
- Importing as sRGB. Normal maps are data, not colour. Import them as linear / non-colour data or the engine will gamma-correct your direction vectors and the lighting will look slightly off.
- Wrong Y convention. See above. If your bumps look like dents, flip the green channel.
- Cranking strength to 5×. Stronger isn’t better — beyond about 1.5× the surface starts looking faceted and the silhouette tells the lie.
- Treating it like a colour map. Don’t blur it in Photoshop. Don’t tweak the curves. Bake or craft cleanly; if you don’t like the result, change the input, not the normal.
Key takeaways
- Normal maps fake fine detail by storing a 3D direction per pixel
- The purple wash is the encoding, not a stylistic choice
- Always tangent-space, almost always 2K, always imported as linear data
- OpenGL vs DirectX disagree on the Y axis — pick the right one for your engine
- AI crafting produces shippable normal maps for most material types in seconds