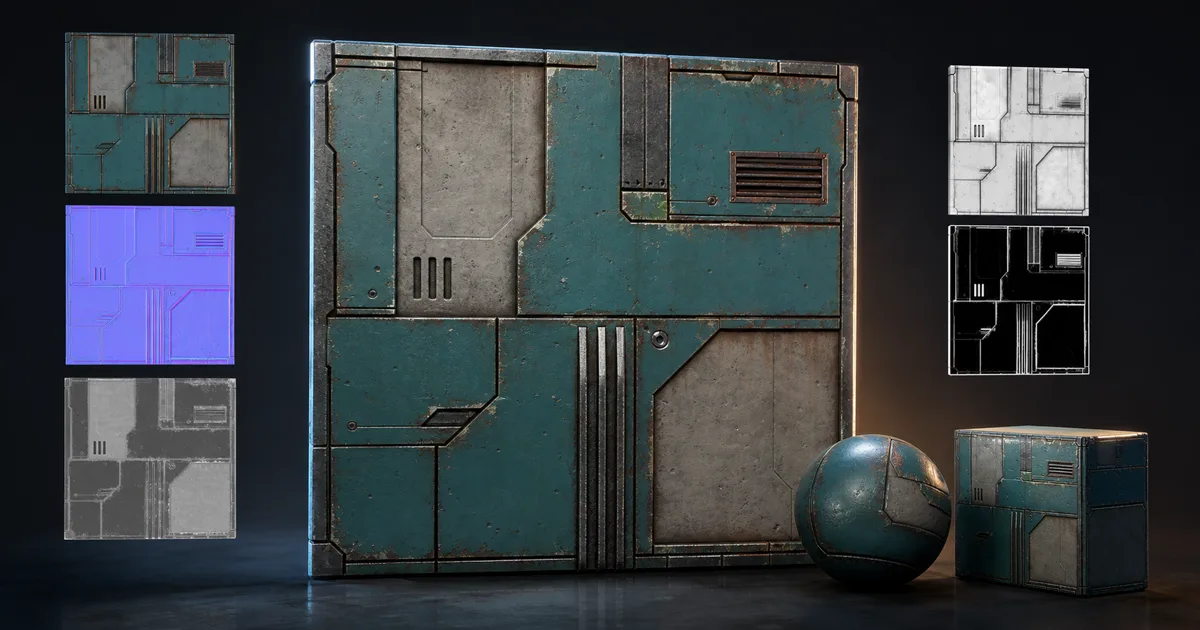
An Unreal Engine texture generator should do more than produce an attractive square. It needs to deliver coordinated base colour, normal, roughness, ambient occlusion, metalness, and height information that survives Unreal’s import rules, material graph, mipmaps, compression, and lighting. A thumbnail can flatter almost anything. A moving specular highlight has fewer social obligations.
This guide follows the material from generation brief to a production-ready Unreal material. It covers map coherence, colour-space flags, DirectX normals, ORM channel packing, material wiring, scale, streaming, and a validation scene that catches errors before they spread through a level.
Decide the material contract before generation
Start with where the material will be used, not with a poetic prompt. A first-person floor needs different frequency detail and memory priority than a distant cliff. A unique hero prop may use baked UVs; a modular wall needs controlled tiling; terrain may need world-aligned projection and virtual textures.
Write a compact contract for the Unreal Engine texture generator:
- Physical substance and layers: for example, powder-coated steel over bare metal with dry rust in chipped areas.
- Real-world coverage: record whether a 2K tile represents one metre, two metres, or another explicit size.
- Required outputs: base colour, tangent normal, roughness, AO, metalness, and optional height or emissive.
- Projection: tileable UV, unique unwrap, trim sheet, decal, or world-aligned material.
- Target: desktop, console, mobile, VR, cinematic, or virtual production.
- Export contract: DirectX normal orientation, lossless source masters, and separate masks before packing.
Painted steel illustrates why this matters: intact paint is dielectric, exposed steel is metallic, rust is dielectric again, and each layer can have its own roughness. If the generator treats dark pixels as metal and bright pixels as non-metal, it has created a mood board with extra files.
Keep renderer-neutral source masters where practical. Store roughness rather than baking a project-specific inversion into the only copy, and keep AO, roughness, and metalness separate until export.
Make the Unreal Engine texture generator produce one material
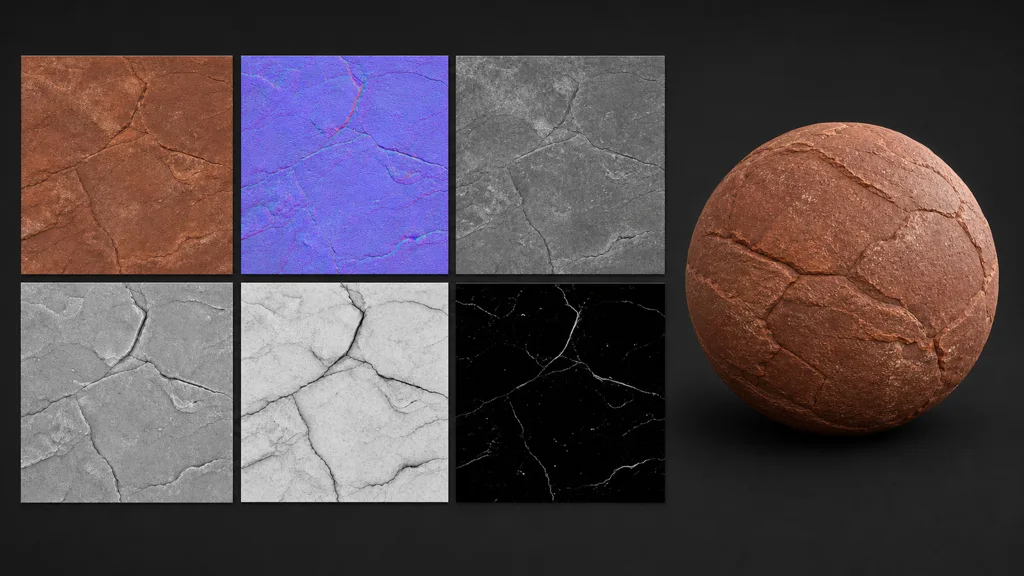
Good Unreal Engine texture creation is coordinated generation, not six independent image requests. A crack can affect base colour, height, normal, roughness, and AO, but it should remain the same crack. A painted chip can reveal metalness at the substrate while the surrounding coating stays non-metallic.
- Base Color contains pigment and material colour without directional light, reflections, or cavity shading.
- Normal changes the apparent direction for small relief and should usually be a tangent-space map.
- Roughness controls reflection spread: white is rough and black is smooth.
- Ambient Occlusion adds restrained indirect-light reduction in tight cavities, not a copy of source shadows.
- Metallic classifies exposed conductive material, with most values near 0 or 1.
- Height describes elevation for displacement, parallax, blending, or offline processing.
Generate broad, medium, and micro detail deliberately. Mortar joints belong to broad height, chips occupy the middle, and pores belong to micro normal and roughness. When every frequency enters every map at full strength, distant mips shimmer and the material resembles a geological argument.
An AI-assisted Unreal Engine texture generator is useful when it recognizes layers and proposes aligned masks. Keep a node-based correction stage for tiling, levels, cleanup, scale, and export. Regeneration explores alternatives; explicit nodes preserve decisions.
Import Unreal Engine PBR textures as colour or data
Unreal’s Texture Editor needs to know whether an image is meant for display or calculation. Base colour and emissive colour usually use sRGB. Roughness, AO, metalness, height, masks, and packed textures are data and should have sRGB disabled.
- Import base colour with sRGB enabled and the normal colour texture compression preset.
- Import a tangent normal with Normalmap compression and confirm it displays as a purple-blue map.
- Disable sRGB for roughness, AO, metalness, height, and packed channel textures.
- Use Masks compression for an ORM texture when its channels contain independent scalar data.
- Keep alpha only when it carries useful data; an empty retained channel still consumes memory.
- Review maximum size, LOD group, mips, and platform format against the actual camera distance.
Avoid JPEG for normal maps and masks. Compression ringing changes numeric data before Unreal applies GPU compression. PNG, TGA, EXR, or another suitable lossless master is safer, depending on bit depth and pipeline needs.
Texture dimensions should normally be powers of two so mips, streaming, and GPU formats behave predictably. Non-square textures are fine when both dimensions follow supported size rules. A 2048 by 1024 trim sheet is not morally inferior to a square; it simply has a job.
Pack ORM and use the correct normal convention
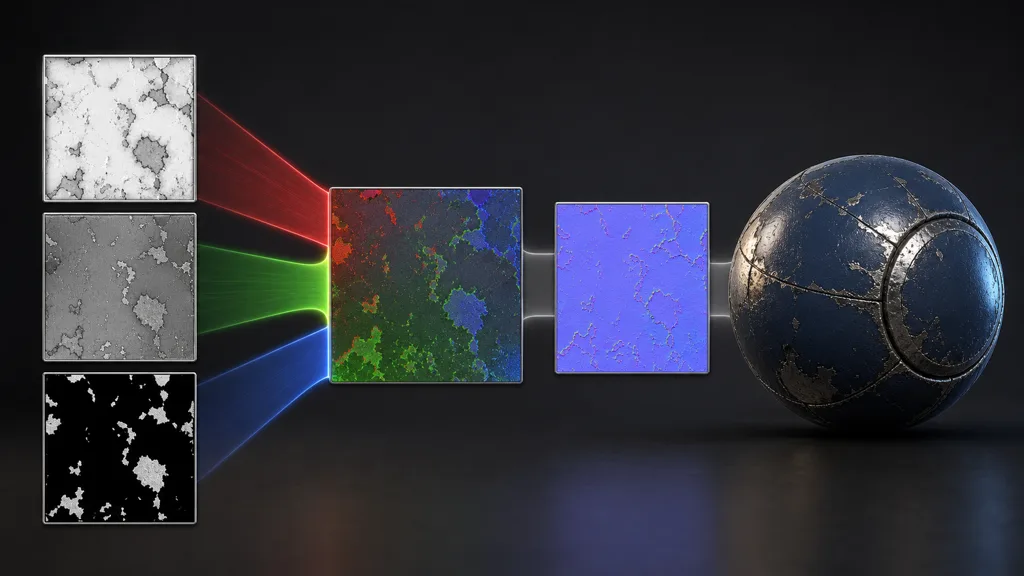
A common Unreal Engine ORM texture packs ambient occlusion in red, roughness in green, and metalness in blue. Connect the Texture Sample’s R, G, and B outputs to Ambient Occlusion, Roughness, and Metallic. Disable sRGB and use an appropriate mask compression setting.
Pack only maps that can share resolution, UVs, mip behaviour, wrap mode, and compression. Channel packing reduces samplers and file count, but a packed 4K texture is still a 4K texture. Arithmetic remains frustratingly employed.
For Unreal Engine normal map settings, use DirectX convention. If a source tool exports OpenGL normals, flip green during export or enable Flip Green Channel in the Texture Editor. Dents rendering as bumps under a rotating light are the usual clue.
Do not infer orientation from colour alone. Test a known raised bevel under a moving light. Excessive normal strength can create crushed grazing angles, broken reflections, and seams at mirrored UVs.
Wire a plain material before adding cleverness
For a baseline Unreal Engine material setup, create an opaque Default Lit material and connect:
- Base colour RGB to Base Color.
- Tangent-space normal RGB to Normal.
- ORM red to Ambient Occlusion.
- ORM green to Roughness.
- ORM blue to Metallic.
Apply a scalar multiplier or remap only when you can explain why it exists. A roughness range control is useful; five nested contrast functions often mean the source map never received a clear review. Use a Material Instance for tiling, normal intensity, roughness, and tint controls artists genuinely need.
Height needs an explicit technique: Bump Offset, Parallax Occlusion Mapping, Virtual Heightfield Mesh, material blending, or offline displacement. Nanite handles dense geometry well, but a height texture is not automatically converted into silhouette detail.
Before adding dirt layers, macro breakup, puddles, or runtime variation, validate the simplest material. The Material Editor is remarkably polite about nonsense; it will compile it anyway.
Control scale, tiling, and streaming as one system
When you generate textures for Unreal Engine, record physical coverage with the asset. If a tile represents two metres, expose a parameter that converts object or world scale into that coverage consistently. Matching texel density matters more than giving every object the same arbitrary UV multiplier.
Test at least a four-by-four repeat. Edge continuity removes seams, but one crack, bolt, stain, or colour island can still become a landmark. Break repetition with low-frequency world-space tint, decals, vertex painting, material layers, or a second macro texture.
Choose resolution from screen coverage. A hero prop may justify 4K; a repeating wall often benefits more from a clean 2K tile plus detail normal and macro variation. Texture streaming avoids keeping every highest mip resident, but it cannot make an oversized source free. Check the streaming pool on the target platform.
Virtual Texturing can help large landscapes and broad layered materials, but it adds page residency and sampling considerations. Use it because the content pattern benefits, not because the checkbox sounds spacious.
Diagnose the failure from the light response
Common failures from an Unreal Engine texture generator become easier to isolate when maps are disconnected:
- The material looks wet: roughness is inverted, imported as sRGB, or compressed poorly.
- Relief is inside out: the normal uses OpenGL orientation; flip green for DirectX.
- Stone patches look metallic: metalness came from brightness rather than substance.
- The colour contains a fixed shadow: base colour still has source lighting or baked AO.
- Fine detail sparkles: normal or roughness energy is too strong for the mips and viewing distance.
- The tile shows a grid: opposite edges match, but internal landmarks repeat clearly.
- A packed map behaves strangely: sRGB is enabled, channel order is wrong, or compression is mixing values.
- Scale changes between meshes: the UV convention or world-scale parameter is inconsistent.
Replace base colour with neutral grey to judge roughness and normal response. Then disconnect normal and ORM to inspect base colour alone. Use Buffer Visualization modes when a suspicious value is difficult to identify in the final shaded result.
For fundamentals, see What Is PBR?, the PBR workflow guide, and How to Make a Normal Map. The texture resolution guide helps match memory to camera distance.
Validate before multiplying material instances
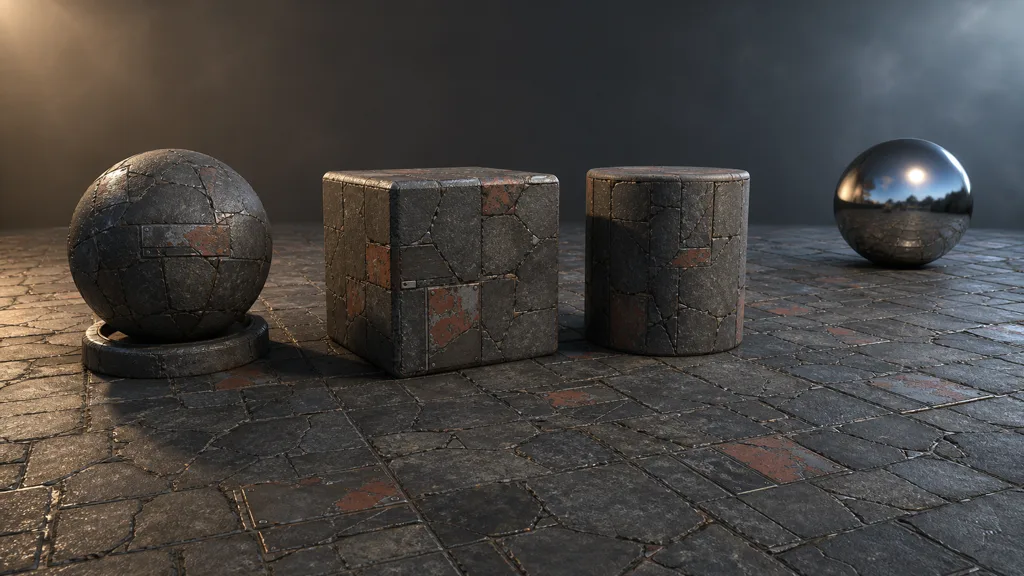
Build a reusable Unreal material lab with a sphere, beveled cube, cylinder, large plane, neutral skylight, reflection capture, one movable light, and a real-scale reference mesh.
- Rotate the hard light across the sphere to reveal roughness range and normal orientation.
- Inspect the cube for UV seams, tangent discontinuities, and implausible edge wear.
- Use the cylinder to expose directional stretching and mirrored-normal problems.
- Tile the plane repeatedly and view it from grazing, middle, and distant camera positions.
- Switch to target scalability and platform settings to inspect compression and mips.
- Compare shader complexity, texture memory, and streaming behaviour with the project budget.
- Save the approved instance with documented physical coverage and export settings.
The best Unreal Engine texture generator in 2026 is not the one that makes the busiest close-up. It produces coherent, editable source maps and a predictable delivery set that holds up under a different light, mesh, distance, and platform.
Try CraftPBR
CraftPBR turns an Unreal Engine texture generator into an editable production route:
- Text-to-PBR creates coordinated maps from a physical material description.
- Photo-to-PBR converts a captured surface into aligned base colour, normal, roughness, height, AO, and metalness.
- Node workspace keeps masks, tiling, range correction, blending, and channel decisions adjustable.
- Engine export prepares DirectX normals, linear data maps, file naming, and ORM packing for Unreal Engine.
- Free tier lets you test a real material before settling on a pipeline.
- CC0 output lets you use, modify, and ship generated materials without attribution.
Create Unreal-ready PBR materials with CraftPBR →
Generate the material once. Let Unreal interrogate it from every camera.