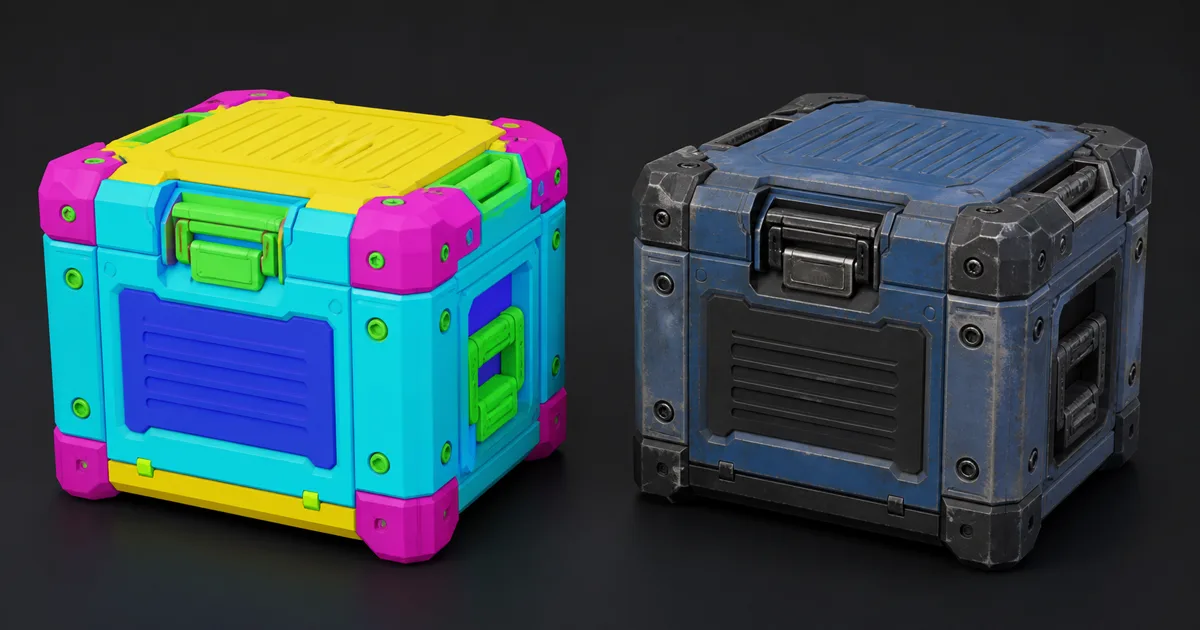
A material ID map looks like somebody attacked a model with the loudest paint set available. Cyan panel, magenta fastener, yellow shell, green grip. It is not trying to look good. It is trying to answer one useful question without hesitation: which pixels belong together?
Texturing tools use those flat regions to select steel, rubber, painted plastic, cloth, glass, or any other planned surface family. One click can seed a layer mask that would otherwise require careful polygon selection or hand painting around every bevel. On a prop with forty parts, that is the difference between a repeatable workflow and negotiating with a lasso tool.
This guide explains how to plan, bake, clean, and use a material ID map, then turn it into masks that survive filtering and engine export. The map is simple data. Its borders are where the engineering lives.
A material ID map is an address book, not a finished PBR map
Each flat color in a material ID texture labels a region. Red might mean bare steel, green rubber, blue painted metal, and yellow emissive glass. The RGB values do not describe base color, roughness, metalness, height, or lighting. They are arbitrary identifiers chosen because a tool can separate them.
That distinction prevents a common mistake: feeding the rainbow map into a shipped Base Color input. In most pipelines, the full color ID map stays in the authoring project. Artists use it to create named grayscale masks, then materials and generators operate through those masks. The exported PBR set contains the final color and surface response, not the selection palette.
A material ID map also differs from a runtime color mask. Runtime masks often dedicate R, G, B, and A to four blend weights or effects. An authoring ID map can distinguish dozens of categorical colors, but bilinear filtering turns a boundary between two IDs into new colors that were never assigned. It is excellent for selection and awkward as an unexamined shader lookup.
Plan IDs from material behavior, not mesh bureaucracy
Do not give every object, bolt, or UV island a unique ID by reflex. IDs should follow texture decisions. Ten identical steel screws can share one ID even if they are separate objects. A single panel may need three IDs when it contains exposed metal, powder coat, and a rubber gasket.
| Region difference | Separate ID? | Reason |
|---|---|---|
| Same steel on several parts | Usually no | One material layer and wear rule can serve all parts |
| Paint over steel | Yes | Coating and exposed substrate need different masks |
| Two colors of identical plastic | Maybe | Separate only if art direction needs independent control |
| Rubber grip beside plastic shell | Yes | Roughness, normal detail, and wear behavior differ |
| Left and right mirrored pieces | Usually no | Shared treatment keeps the asset consistent |
| Temporary construction parts | No | Source bookkeeping should not leak into texture logic |
Keep an assignment sheet for large assets: ID name, source material or vertex color, intended layer, and whether the region must become runtime data. The palette values themselves need not resemble final materials. In fact, neighboring IDs should be far apart in RGB space. Two nearly identical blues save no dignity when tolerance selection grabs both.
Reserve IDs before the bake. Changing one source material after masks, generators, and manual edits depend on it can invalidate hours of work. A stable boring convention wins here. The exciting part can happen in roughness.
How to make a material ID map that survives the bake
A reliable material ID map baking workflow has eight steps:
- List material families. Group surfaces by physical and artistic behavior.
- Choose the source. Use material assignments, object or polygon groups, or vertex colors supported by the baker.
- Assign distinct flat colors. Separate adjacent regions strongly and avoid gradients.
- Finalize the destination. Lock UVs, triangulation, smoothing, names, and low-poly topology.
- Match meshes. Use the same naming and cage logic as normal, AO, and curvature bakes.
- Bake at authoring resolution. Match the texture set or work higher when thin boundaries demand it.
- Inspect and repair. Check projections, seams, padding, edge coverage, and color contamination.
- Convert IDs into masks. Build named editable masks; keep the rainbow source as reference data.
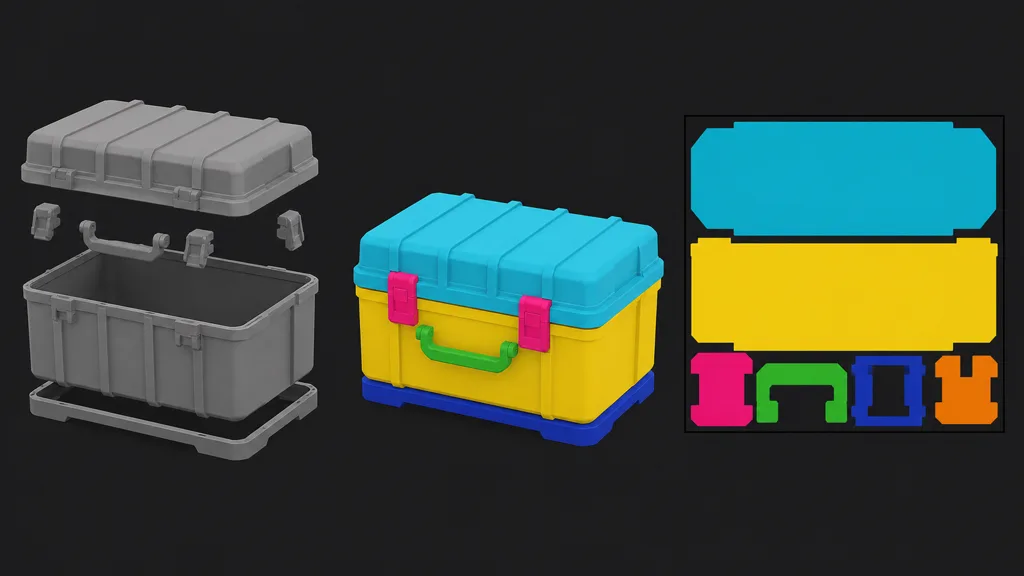
Adobe describes baking as transferring mesh information into textures, and Painter includes an ID output among its mesh maps. Its current mesh-map baking workflow shares resolution, dilation, high-poly input, and cage settings across bakers. Treat the ID output as part of that matched set, not a casual screenshot from another mesh revision.
Material assignments are ideal for hard-surface assets with discrete substances. Vertex color is better for dense sculpted meshes, ZBrush polygroups, or boundaries that do not follow material slots. Object and polygon-group modes can be fast for modular kits. Test one asset before standardizing: exporters do not preserve every grouping convention equally.
Material ID map edges need a declared policy
At a diagonal boundary, one output pixel may cover two source regions. Anti-aliasing represents that partial coverage with an intermediate color. That looks smoother, but it also creates a value that is neither ID. Disabling anti-aliasing preserves categorical colors and creates stair steps. Neither choice is universally correct.
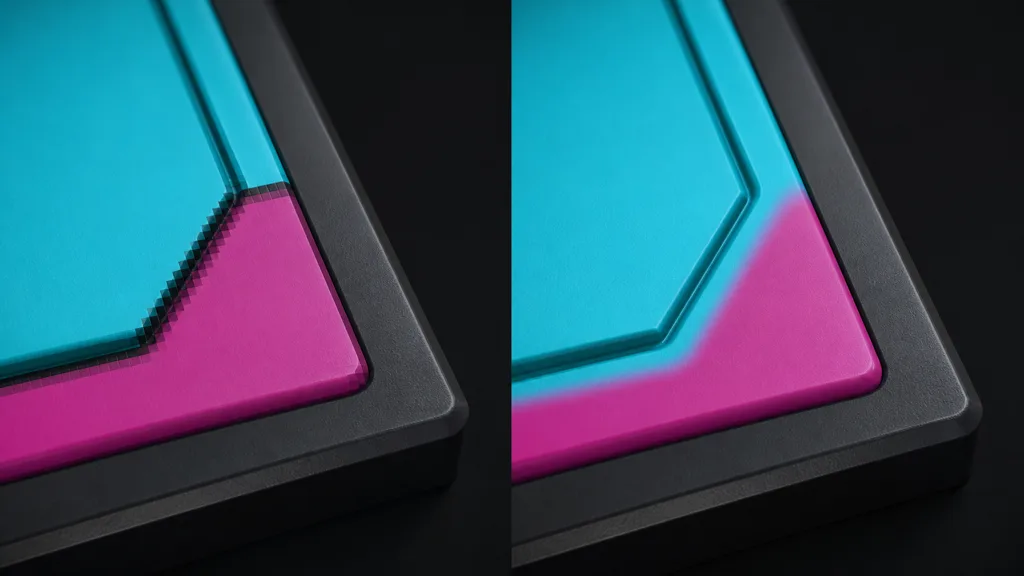
For authoring selections, supersampling plus a controlled color tolerance often gives the cleanest masks. Select the intended ID, inspect the resulting grayscale mask, then apply a tiny contract, expand, or level adjustment if needed. Do not repeatedly select from a JPEG-compressed ID map; ringing creates a small civilization of accidental colors.
Dilation matters outside UV islands. Padding should repeat the nearest valid ID far enough to cover downsampling and filter footprints. A black gutter touching an island edge can become a dark halo after mip generation. Match the padding assumptions described in the texture baking guide, and inspect the lowest mip that will influence the authored texture set.
Thin features deserve explicit tests. A one-pixel wire, trim strip, or gasket may vanish when the bake shrinks. Increase resolution, widen the authored boundary, move the feature to geometry, or accept that it is not a stable material region. The texture cannot preserve a category smaller than its sampling footprint through politeness.
Use material IDs as mask seeds, then make the masks editable
In Substance 3D Painter, the usual how to use a material ID map answer is Color Selection on a layer mask. Bake the ID map, add a black mask to a fill layer, use Color Selection to pick one or more IDs, and name the resulting mask by intent: painted_shell, bare_fasteners, or rubber_grip.
Do not stop at the raw selection. Real objects rarely preserve manufacturing boundaries perfectly. Paint chips cross the coating edge, dust settles over several substances, and sealant overlaps a seam. Combine the ID-derived base with paint, generators, procedural noise, or hand-authored corrections. The ID says where a material begins; the working mask says what happened to it.
A material ID map Blender workflow can use flat emission materials baked into UV space, vertex colors routed through a shader, or index-based render passes. Blender’s Material Pass Index can feed an ID Mask in compositing, but index passes have different anti-aliasing behavior from a color bake. Choose the route based on whether you need a render isolation mask or a reusable texture-space map.
Keep IDs separate from procedural evidence such as curvature, AO, position, and thickness. A steel ID can restrict an edge-wear generator, but it should not encode where wear occurs. The curvature map guide covers that geometric evidence; combining the two sources produces editable cause-based masks.
Convert color IDs before the runtime shader
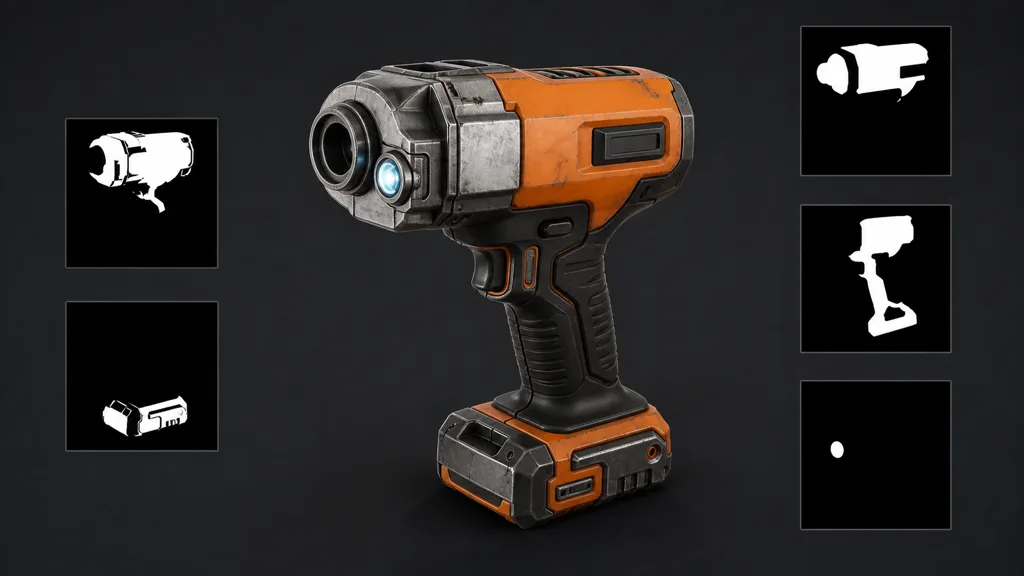
If the shader needs adjustable paint color, emissive intensity, dirt coverage, or a two-material blend, export those specific grayscale masks. Compatible masks can share RGBA channels; the texture channel packing guide explains the format, color-space, and compression tradeoffs.
Do not decode an arbitrary rainbow material ID texture in the engine with exact RGB equality after filtering and compression. A texel near a red-green boundary may become brown, mipmaps average entire neighborhoods, and block compression perturbs stored values. Nearest filtering can preserve categories at one scale while producing harsh motion and poor minification.
When a runtime really needs many discrete regions, use a deliberately encoded integer-style index texture and a shader contract designed for it, or store separate weights in known channels. For ordinary props, exporting two or three purposeful masks is clearer and often cheaper than shipping every authoring category.
Material ID masks in Unreal Engine and Unity
For a material ID map Unreal Engine workflow, turn selected IDs into linear grayscale masks before import. Epic’s texture masking documentation shows how grayscale or packed channels isolate material effects and advises disabling sRGB for mask textures. Use named Material Function inputs or Material Instance parameters so artists know whether a channel controls paint, metal exposure, emissive areas, or something else.
For a material ID map Unity workflow, the same rule holds: ship defined masks, not an unexplained palette. Unity HDRP’s Mask Map format is a fixed example: metallic, occlusion, detail mask, and smoothness occupy specific channels and the texture imports as linear data. A custom Shader Graph may use a different packing contract, but document it beside the exporter.
Compression depends on mask meaning. Soft dirt or wear weights may tolerate smooth block compression. A binary material boundary may show ringing or color bleed. Check each channel separately at game distance, not only the attractive composite thumbnail. Alpha can change format and memory cost, so it is not a free fourth drawer.
Validate the material ID map by changing the materials
A useful validation scene makes mistakes obnoxious. Assign extreme temporary materials to every selected region: mirror metal, chalky white dielectric, glossy black plastic, bright emissive, and rough rubber. Rotate the light and camera. A missed polygon or contaminated edge becomes obvious immediately.
Run this checklist before painting:
- every intended surface belongs to exactly one ID;
- neighboring IDs remain separable after the bake;
- no projection from nearby high-poly parts crosses a boundary;
- thin regions survive target resolution;
- UV padding contains valid nearby IDs rather than black gutters;
- mirrored and stacked UVs behave intentionally;
- the ID bake matches the normal, AO, and curvature mesh revision;
- exported runtime masks import as linear data and survive compression.
The best material ID map workflow 2026 records the source assignment mode, palette or index convention, mesh-matching rule, resolution, sampling, dilation, selection tolerance, mask names, channel packing, and runtime import settings. That sounds fussy for a rainbow image. So does a fire drill until one is useful.
FAQ
What is a material ID map?
A material ID map is a texture whose flat colors identify surface regions on a 3D asset. Texturing tools use those colors to select parts quickly and build masks for metal, paint, rubber, fabric, and other material families.
How do you make a material ID map?
Assign distinct materials, object groups, polygon colors, or vertex colors to the source mesh, then bake that information into the UVs of the destination mesh. Use stable colors, enough padding, and the same cage and mesh matching rules as the rest of the bake set.
Should a material ID map be anti-aliased?
For authoring selections, mild anti-aliasing usually produces cleaner diagonal and curved borders. The selection tool needs a tolerance or color-selection mode that captures the intended region without importing neighboring IDs; runtime categorical masks may need explicit thresholding.
Is a material ID map the same as a color mask?
They can contain similar flat colors, but their jobs differ. A material ID map vs color mask comparison comes down to destination: the ID map usually labels authoring regions, while a color mask often ships and directly blends properties in a shader.
Can you bake a material ID map in Blender?
Yes. Assign flat emission colors or use material and object indices as the source, then bake or render those assignments into the target UV layout. Keep color management neutral and verify that filtering has not invented colors along boundaries.
How do you use a material ID map in Substance 3D Painter?
Bake the ID mesh map, add a black mask to a fill layer, then use Color Selection to isolate the desired ID. Build actual editable masks from those selections instead of painting directly into the ID texture.
Should a material ID map be included in a game build?
Usually no. Keep the full-color ID map as source data, then export only the grayscale or channel-packed masks the runtime shader needs. Ship the ID map only when a custom runtime system genuinely decodes it.
Try CraftPBR
CraftPBR turns the selected regions into a coherent material set instead of leaving them as cheerful placeholders:
- Text-to-PBR generates aligned base color, normal, roughness, height, AO, and metalness from a material brief.
- Photo-to-PBR converts a controlled surface reference into coordinated material data.
- Node workspace keeps masks, levels, tiling, roughness, height, and layer relationships editable.
- Engine export prepares normal orientation, scalar color space, channel packing, filenames, and target conventions.
- Free tier lets you generate and validate a full PBR material before committing it to an asset.
- CC0 output lets you modify, combine, bake, render, and ship generated textures without attribution.
Give every ID a material worth selecting
Generate coherent PBR maps, refine them in the node workspace, then export the exact masks and channels your engine expects.
Create a PBR material in CraftPBRKeep the palette loud, the boundaries clean, and the shipped data boring enough to trust.